Last updated: December 6, 2025
Digital images flow from your camera's sensor to its storage medium, then to your computer and beyond. Organizing, editing, sharing, and archiving this data is just as important as capturing the moment. If a photo can't be shared 20 years from now, did the moment happen?
My photo development workflow, detailed below, has evolved as technology, software, and my perspectives change. Consider integrating some of these ideas into your own digital photo workflow.
The best way you can show me that this resource is useful is to support me on Patreon. $3 unlocks access to exclusive full-resolution photographs, and you'll get notified when I publish work like this.

The minimal gear required to obtain value from this article is a camera and a computer. That being said, some gear and software relevant to my specific workflow includes:
- A Canon R5 camera
- A powerful Windows computer with a fast SSD and 22TB of slower storage
- Lightroom Classic (not Lightroom CC)
- For offline backups, a home server with 24TB of slower storage
- For offsite backups, an external 14TB HDD stored with my in-laws
- For online backups, Backblaze Personal Computer Backup
The roles of this particular equipment will become clear throughout this document.
My computer's name is Öxarárfoss , and it looks like this:

After a photo walk, event, or portrait session, I will have hundreds of raw photos stored on my CFexpress card. It is untenable to edit or share every captured image, so I must cull most of the images and choose to focus only on a select few.
When I have a quiet moment, I use my camera's dedicated RATE button to flag images as important to my future self. On my R5, the RATE button is located on the top left of the rear face of the camera:
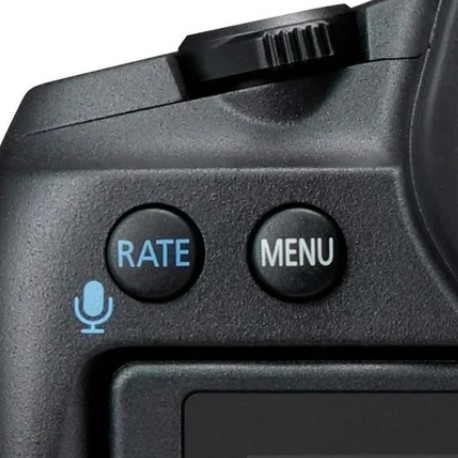
By pressing this button while reviewing a photo, the camera injects a star rating into the displayed image's metadata. I have modified my R5's settings to only allow setting a photo's rating to 0 or 4 stars. By default, the R5 can set an image's rating to a value between 0 and 5, inclusive. The 4-star rating I set using my camera is only used to flag photos that warrant more care later.
It is common to snap several photos of the same subject within a few milliseconds. One challenging aspect of culling is selecting the single best shot from a series of visually similar images. Practice yields speed. Culling is not binding; you can always change your mind. I use my camera's magnification button to zoom into small details for making a tough decision between two "indistinguishable" photos.
A four-star photo indicates "this photo requires additional attention."
I get home, gently ask my son to put the card into the USB3 card reader, and open Lightroom Classic. In LR's Library tab, I click  in the bottom left of the window.
In the Import dialog, I:
- Select my memory card on the left under "Source"
- Set my import mode to Copy at the top center
- Under Destination on the right:
- Set "Organize" to "By date"
- Set "Date Format" to "YYYY/YYYY-MM-DD", i.e.
2026/2026-10-18 - Set the destination folder to
C:/Photos
- Click

I organize files and folders according to the ISO-8601 date naming scheme because they sort nicely.
Copying the image files to my SSD preserves the star rating flags I set on the camera.
If I didn't get the chance to star photos on my camera earlier, now is the time I cull with a keyboard. I speed *through images in the Library tab using the arrow keys, smacking "4" on the numpad when I stumble across an image that makes me feel something. This achieves the same result as if I were culling on my camera, except using a bigger screen.
In Lightroom, I switch to the Develop tab. Next, I enable the 4-star metadata filter by clicking on the fourth star on the bar towards the bottom of the window:

Now, I'm only looking at photos I know I want to edit. I usually edit between 5% and 20% of the photos I captured on my memory card. To give you some specific pick rates:
- During a pregnancy celebration session, I took 496 photos and edited 81 (16%).
- When I visited Hersheypark , I took 819 photos, edited 57 (7%), and published 23 (3%).
- At Wings & Wheels , I took 540 photos, edited 98 (18%), and published 52 (10%).
- During a portrait session, I took 467 photos, edited 25 (5%), and the client selected 1 (0.2%).
This is also a great time to cull further by peeking at the four-star images and flicking away one of their stars. Begone!
Set intentions before taking photos: For how many keepers do you yearn this session? Five? 100?
It's time to use the tools! Much like developing film in a darkroom, this part is super subjective.
For each 4-star image, I crop, adjust color and exposure, and repeat until I'm satisfied.
When adjusting those tiny sliders in the Develop panel, I like to click my mouse's DPI Shift button to slow my cursor down. This lets me make very fine adjustments to the slider values.
Sometimes, I'll pull an image from Lightroom into Photoshop and use its unique tools, like pixel-perfect masks and powerful generative AI features. Once I'm finished editing a photo, it receives a five-star rating with a quick tap of Numpad 5, then I move on to the next image.
Edit one photo in a set as an "anchor," then sync changes to others with the  button.
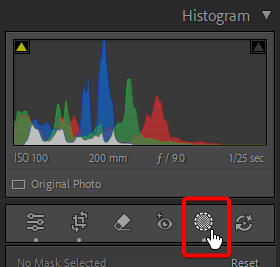
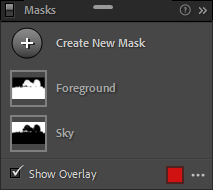
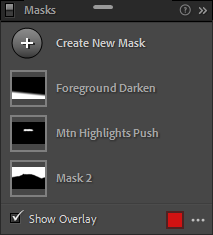
I often use Masks to emphasize or de-emphasize a subset of my image. Click the Masking icon in the top right of the Lightroom window, below the Histogram:
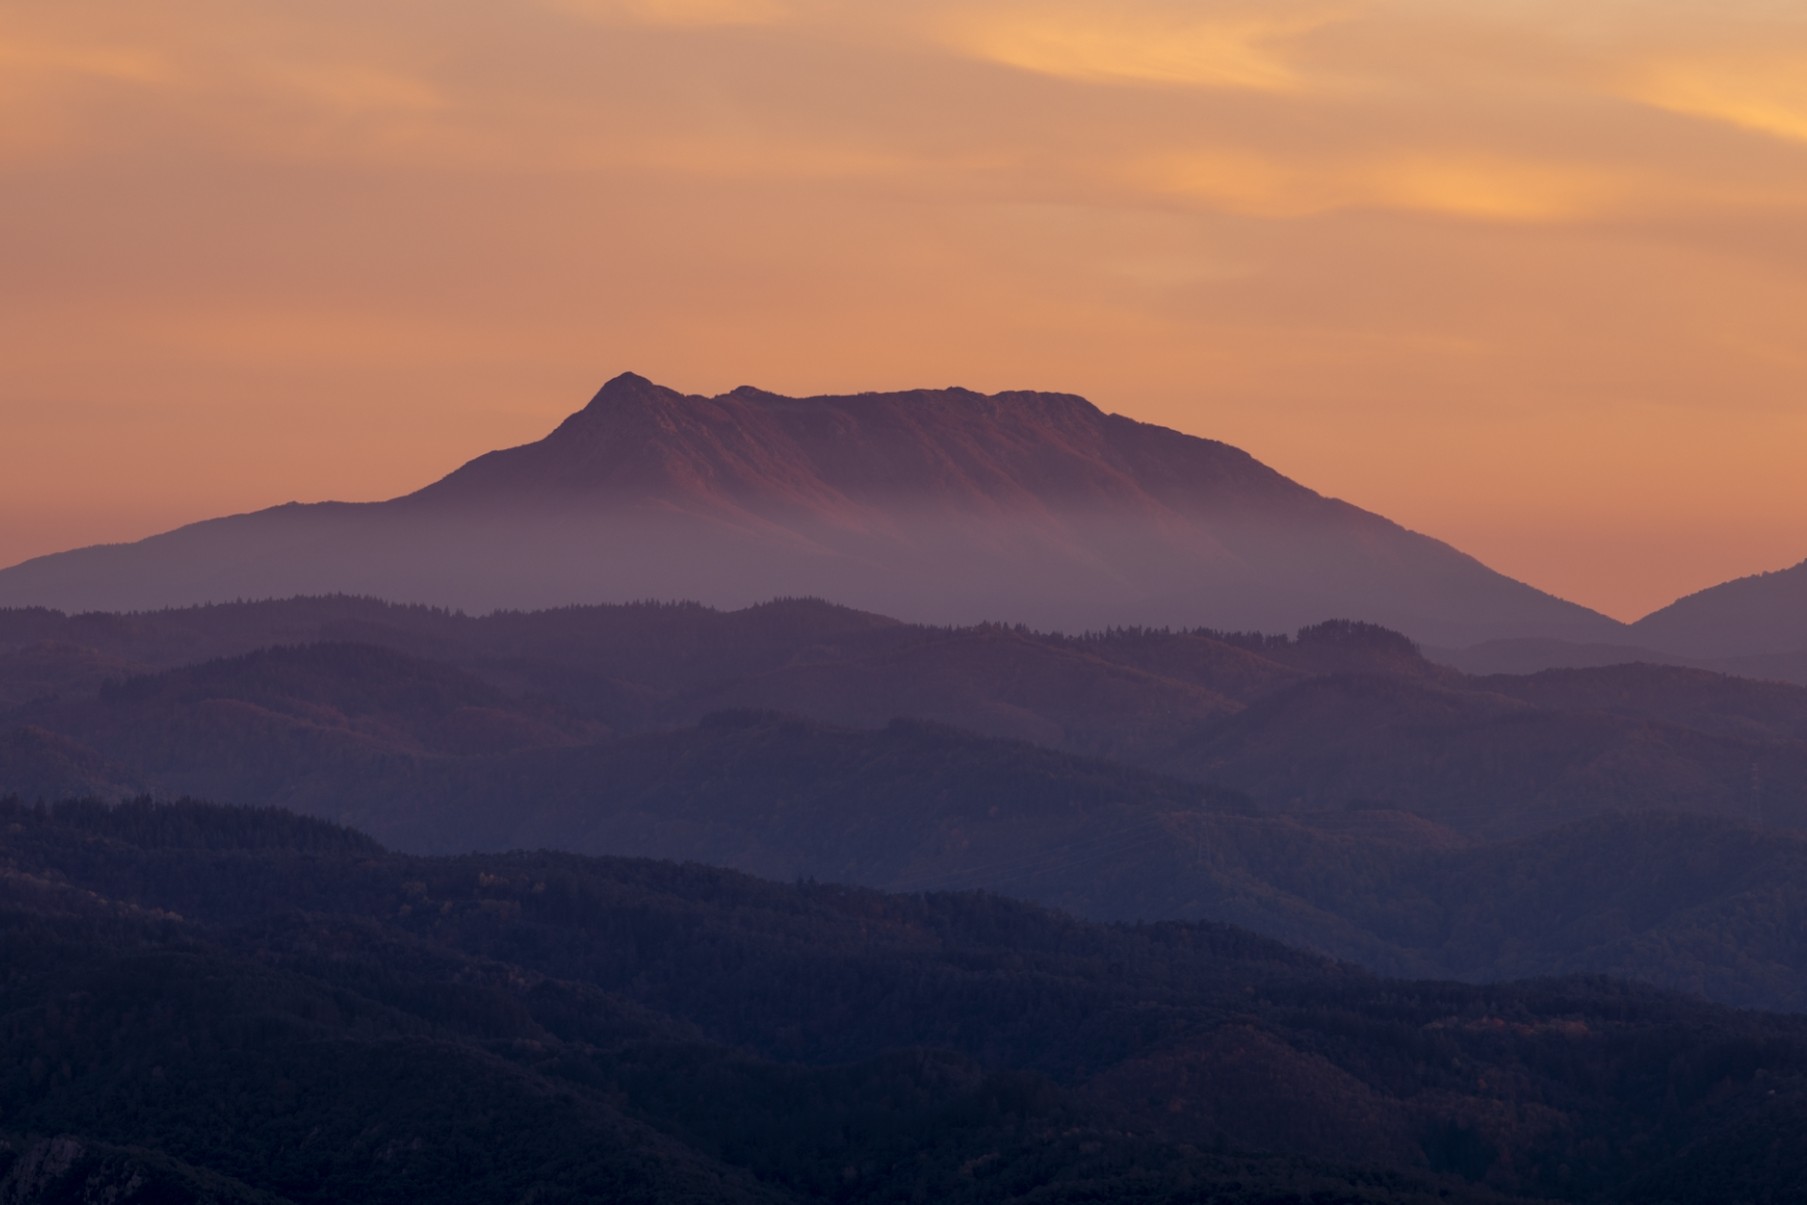
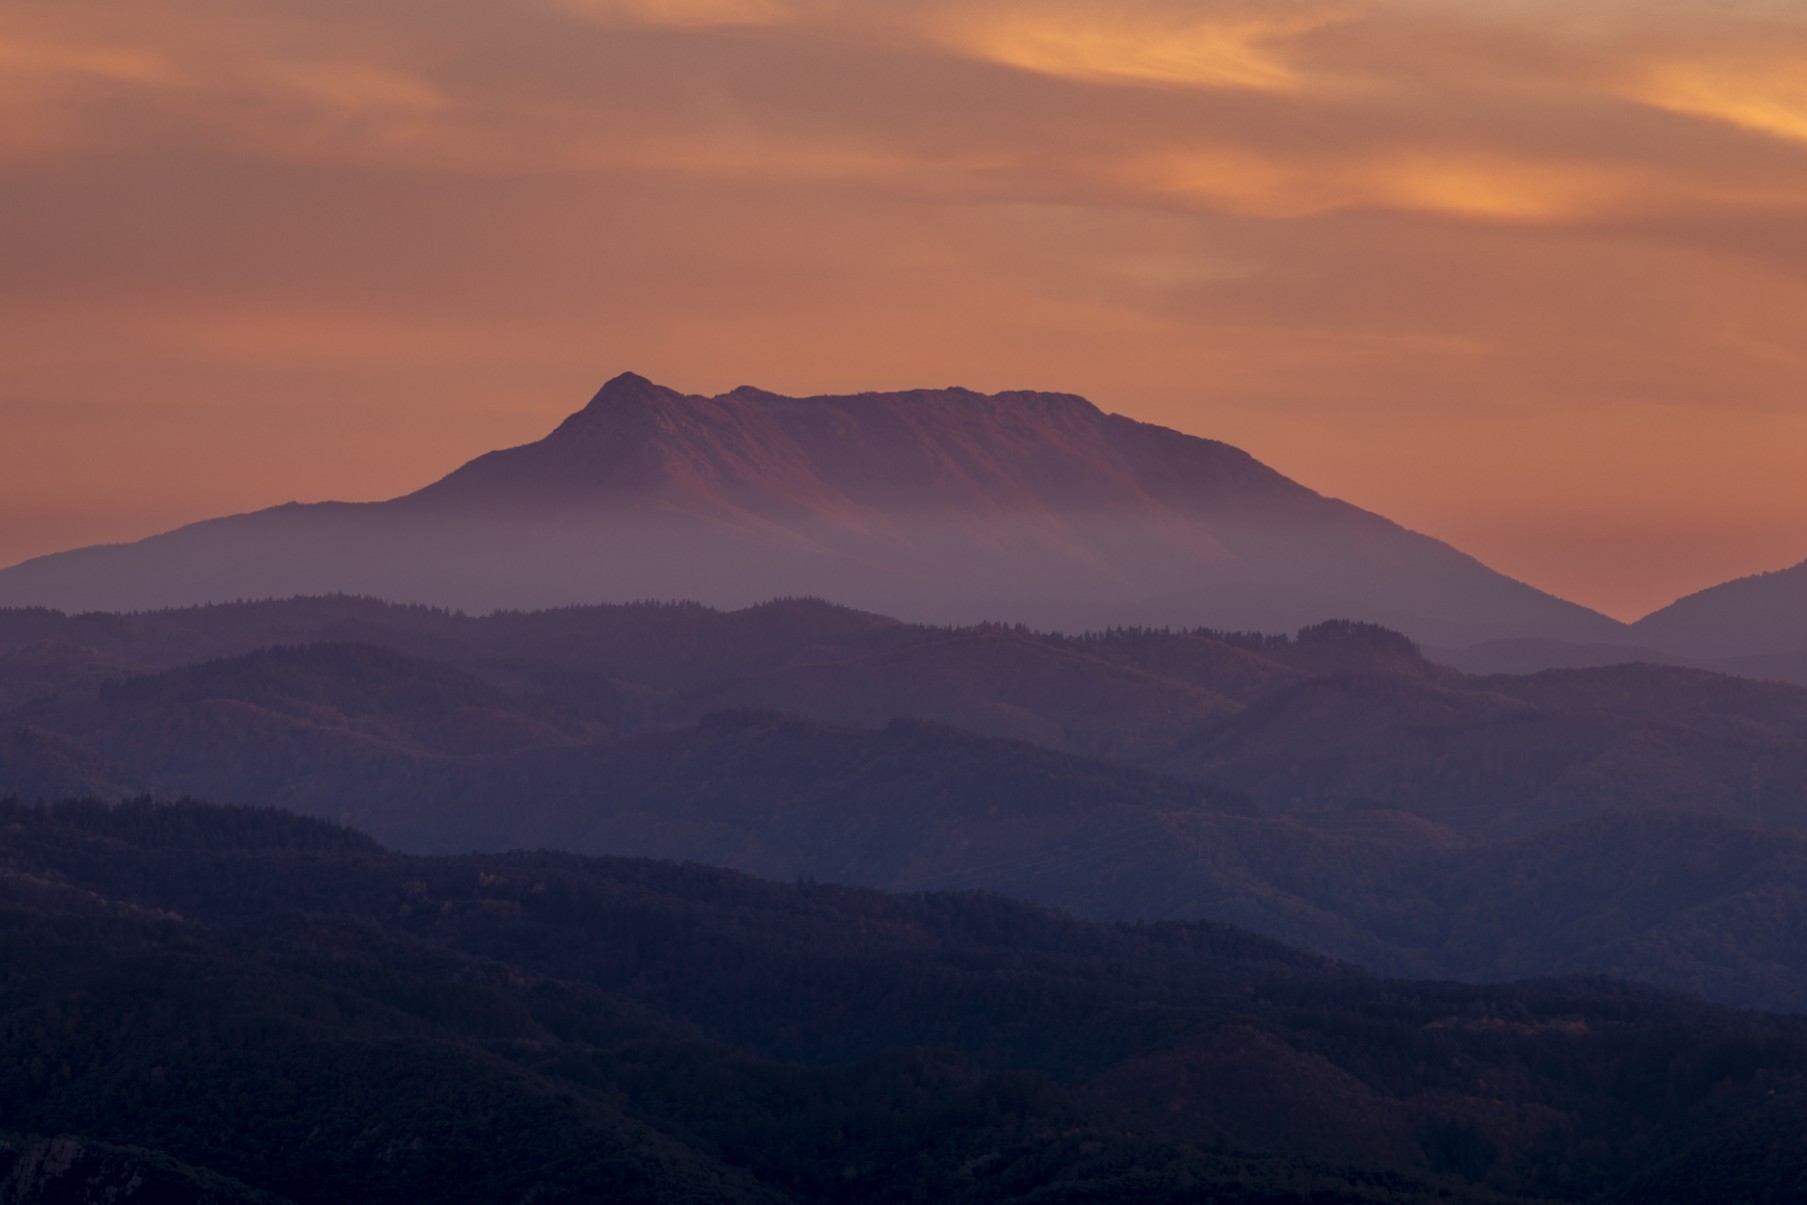
Below are two before/after examples of the dramatic differences masking can make.

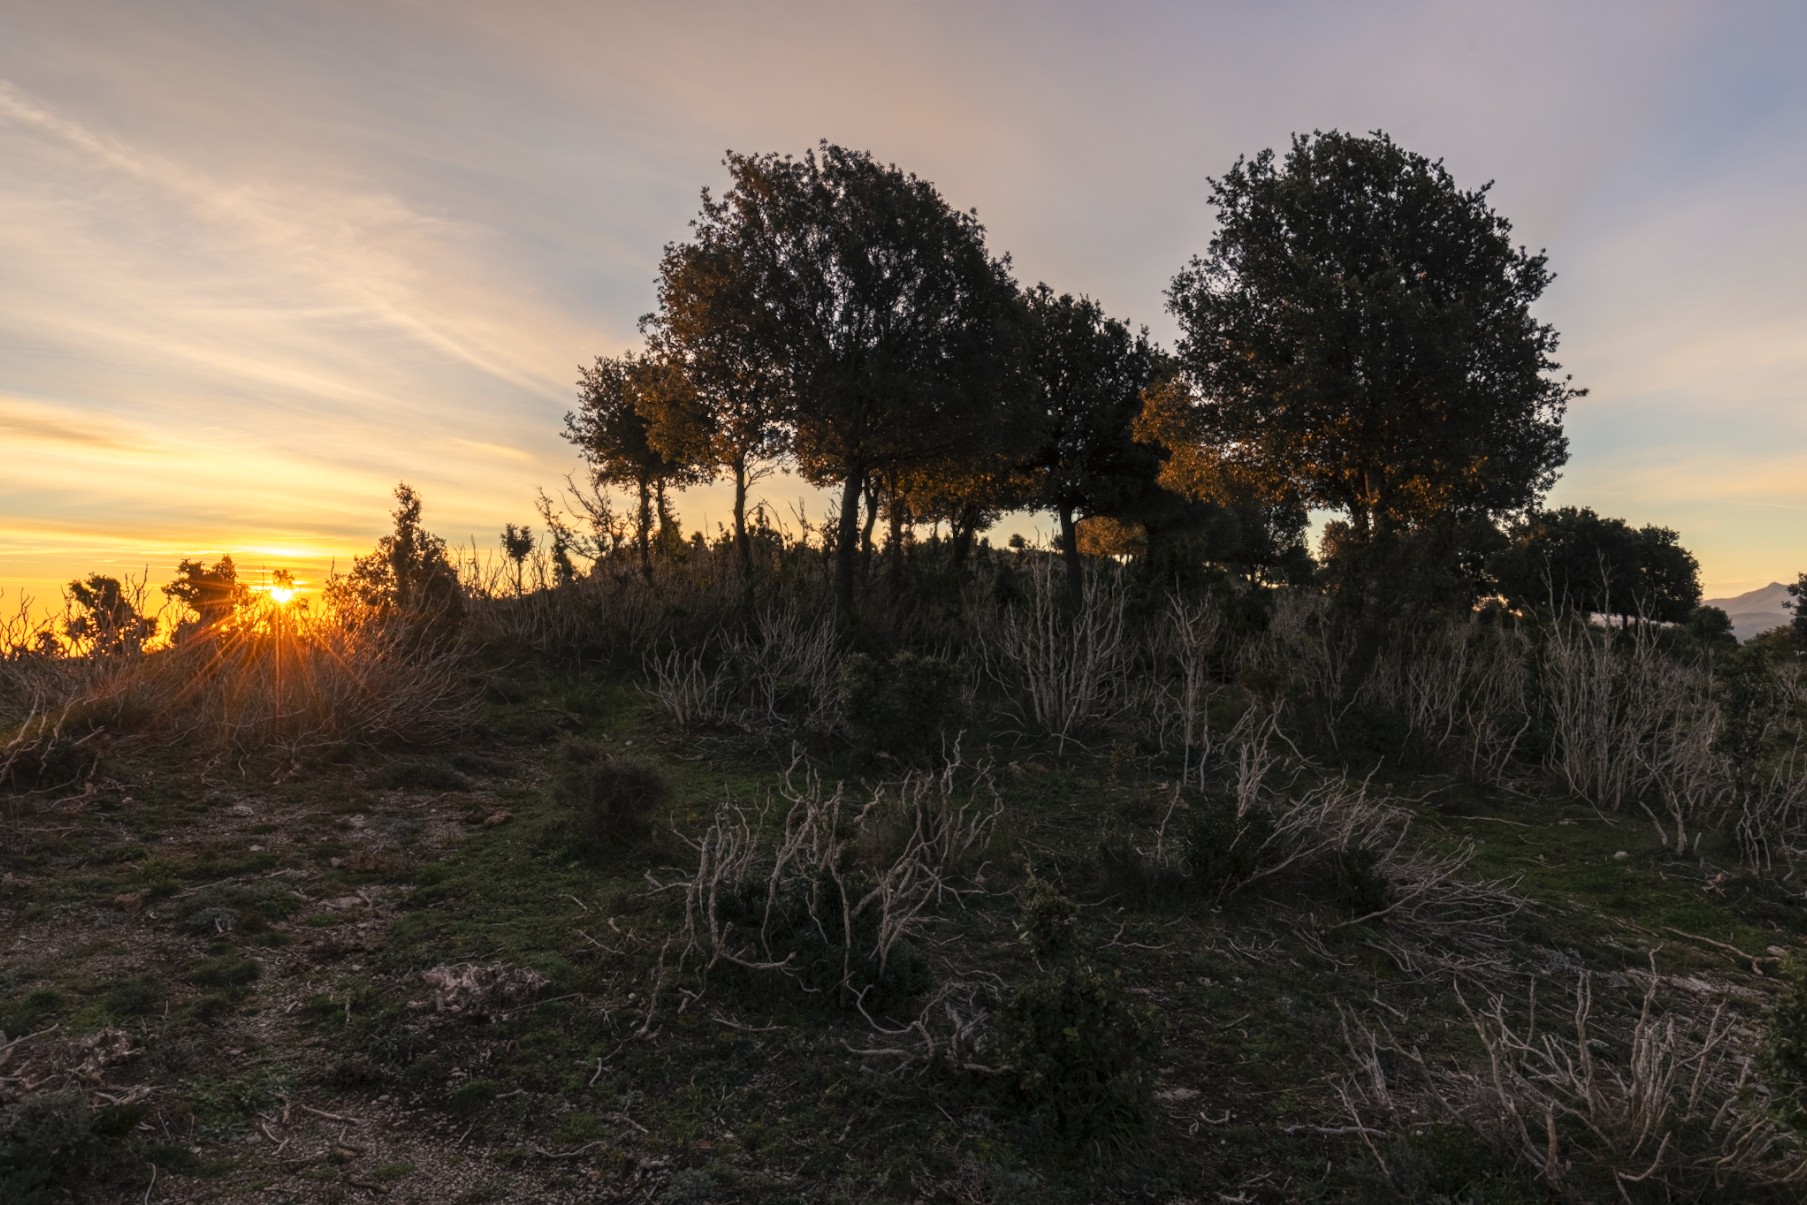
Before masking
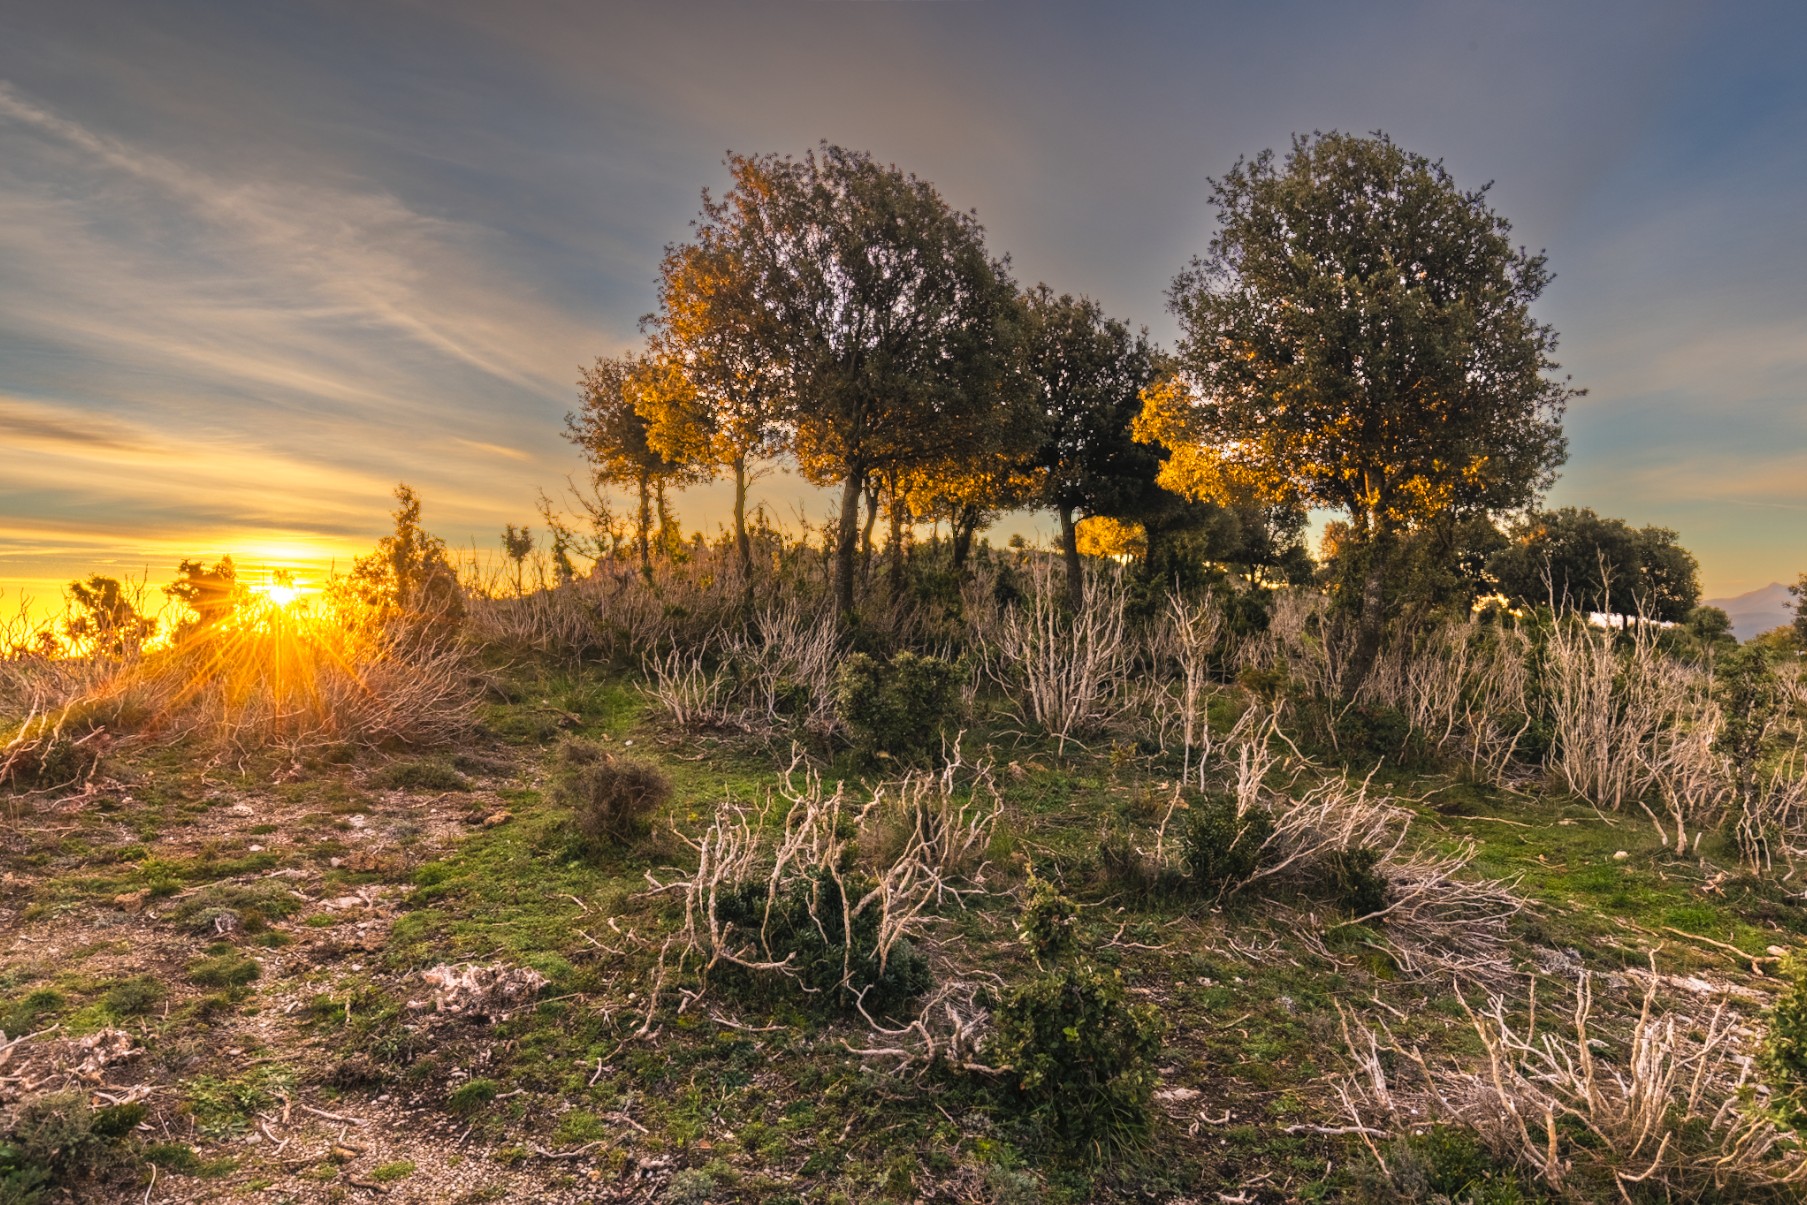
Support me on Patreon for $3 to download exclusive full-resolution photographs and get notified when I publish work like this.
Money: It's highly encouraging!
To save these edited, five-star photos, I must export them as JPG images to a folder on my hard drive.
Before I export the images from Lightroom, I must create a place on my computer for the files to live. Inside a Dropbox folder called "Best Photos", I create a new subfolder associated with the collection of images to be exported. That subfolder follows the dated naming scheme YYYY-MM-DD <Collection/Event Name>
Some folders inside my Dropbox include:
- 2025-12-05 Cass in the Snow
- 2025-10-08 - 2025-10-14 Trip to Topsfield and Raleigh with Liv and Cass
- 2025-03-20 Bryant Park to Times Square After Therapy
- 2013-05-11 - 2013-05-19 Trip to KY
To export from Lightoom, I right click any image in Lightroom's Filmstrip, then select "Export", then "Export...". Alternatively, I highlight some images, then click the Export button at the bottom left of the Library window.
This opens the Export dialog, where you can change various settings, such as output filetype, file name, and file location. Over the years, I have developed 14 export presets for various situations. My most commonly-used export preset uses the following settings:
Export Location
| Export To: | |
| ⬜ Add to This Catalog | |
| Existing Files: |
File Naming
| ✅ Rename To: | |
Click Custom Settings > Edit... Then, manipulate the filename template field such that it reads:
| |
| Example: | 2025-12-05 08-24-23 ZFP_1107.jpg |
| Extensions: |
Video
| ✅ Include Video Files: | |
| Video Format: |
File Settings
| Image Format: | |
| Quality: | 100 |
| ⬜ Limit File Size To: | |
| Color Space: | |
| ⬜ HDR Output |
Content Credentials
Image Sizing
| ⬜ Resize to Fit: | |
| Resolution: | 300 |
Output Sharpening
| ⬜ Sharpen for: |
Metadata
| Include: | |
| ⬜ Remove Person Info: | |
| ⬜ Remove Location Info: | |
| ⬜ Write Keywords as Lightroom Heirarchy: |
Watermarking
| ⬜ Watermark: |
Post-Processing
| After Export |
In my Export dialog, I saved the preset associated with the above settings with the name:
Choose Folder - Full Res JPG@100% | Renamed
I can then quickly export photos and videos to my named Dropbox folder using that preset.
You can download all of my export presets below. They're named using the following convention:
<Filesystem Destination> - <Resolution> <Filetype>@<Quality> | <Description>
Zach Fox Photography Export Presets
Import these presets by right clicking under User Presets in Lightroom Classic's Export dialog. All of these presets are text files, so you can inspect them in a text editor.
Now that my edited images are saved as JPGs in my Dropbox, I can share them anywhere.
Sharing via Messaging/Social Media
Each full resolution photo from the R5 can be 20+ megabytes, which most social platforms deem too large. Thus, I have to scale down the images. My preferred method to do this is as follows:
Windows
- Copy the relevant photos to my PC's desktop
- Select all the files, then right click one of them and select "Resize with Image Resizer"
- Image Resizer is a tool bundled with Microsoft PowerToys
Resize the long edge of each image to 3840 pixels (4k resolution).
- Share!
MacOS
- Copy the relevant photos to my Mac's desktop
- Drag all the files into PhotoBatcher Pro
- There are other utilities that perform batch operations like resizing, some of which are free.
- Resize the long edge of each image to 3840 pixels (4k resolution)
- Share!
Sharing Public Images
My preferred way to share a gallery of photos is via the Stories section of this website. My custom content management system, Presence, can quickly ingest hundreds of photos and transform them into a web-resolution, optimized .avif image gallery viewable in any browser.
Presence also records each photo's metadata. That data is presented in the image viewer like this:
| Photo Metadata | |
|---|---|
| Date | Thursday, September 29, 2022 at 3:27:07 PM |
| Camera | Canon EOS R5 / RF24-70mm F2.8 L IS USM |
| Settings | 24mm / f/2.8 / 0.0005s / ISO 160 |
| File | 2022-09-29 15-27-07 Blue IMG_0177.jpg |
This example metadata is from an image in Rescued from Hawaiian Mountains .
Sharing Private Images
Presence can create optimized, encrypted or unencrypted image galleries that can be hosted on any web server. To view such a private gallery, trusted individuals can input the gallery's URL (and password) into the private image viewer at https://zachfox.photography/viewer/
Having a data backup strategy is critical to prevent irreplaceable data loss. Find a backup system that works for you, and regularly back up your precious data.
I would need dozens of huge hard drives and a big cloud storage lake to store all of the RAW images I've accumulated over the years, and I wouldn't even look at a vast majority of those images. My photo backup strategy takes some self-discipline and time, but I can rest assured my entire photo archive is [probably] safe and stored in a reasonable quality I have explicitly chosen.
Each of the edited images that originate from my R5 are stored in the following five places:
- My main PC's local disk
- Dropbox's cloud servers
- I pay for Dropbox Plus , which costs $119.88/year as of December 2025.
- Backblaze's cloud servers
- I pay for Backblaze Computer Backup , which costs $99/year as of December 2025.
- My home server's 24TB HDD
- Immich is running on this server. Immich is the best way to safely organize huge photo libraries without relying on cloud services.
- A WD Elements 14TB USB3 external HDD
- I periodically use Restic to back up a bunch of data, including photos. Then, I physically store this disk at my in-laws' house.
So, what about all of the photos that don't get edited? What about all of the photos I take with my phone? What about videos? I gotchu — all of this important data is backed up as well.
Periodic Data Offload Process
Once every few months - usually when Lightroom starts to feel sluggish or my SSD fills up - I perform a Data Offload.
I begin by creating a new folder on my 14TB HDD inside F:\Photos\. This new folder follows the naming scheme YYYY-MM-DD SSD Offload, i.e. 2026-10-18 SSD Offload.
Inside this Offload folder are several subfolders, each of which contains specific data:
3072px JXLs- Contains unrated, unedited still photos not captured by a phone.
- JXL is a next-generation image format which takes longer to compress each image but yields a smaller filesize for the same quality as JPG. JXL images also include EXIF metadata.
- How?
- In Lightroom's Library tab, use the Metadata filter to exclude phone photos. Use filters in the Toolbar to include only "0-star", unedited photos or virtual copies, and exclude videos.
- Select all remaining photos, then Export using the "
Choose Folder - 3072px JXL@70% | Archival, Renamed" Preset. Phone Pictures- Contains photos and videos captured by a phone (either mine or someone else's).
- Exported as a Lightroom catalog to preserve photo edits.
- How?
- In Lightroom's Library tab, use the Metadata filter to exclude everything not captured by a phone.
- Select all remaining photos, then click File > Export as Catalog...
- Navigate to the "SSD Offload" folder (exporting as a catalog automatically creates a new subfolder).
- Next to "File name:", input "Phone Pictures".
- Check ✅ Export selected photos only and ✅ Export negative files.
- Uncheck ⬜ Build / Include Smart Previews and ⬜ Include available previews.
- Click Save
Rated RAWs- Contains still photos rated ≥ 1 star not captured by a phone. This will preserve the RAW photos associated with final, edited JPGs.
- Exported as a Lightroom catalog to preserve photo edits.
- How?
- In Lightroom's Library tab, use the Metadata filter to exclude everything captured by a phone. Use filters in the Toolbar to include only ≥ 1 star, edited photos or virtual copies, and exclude videos.
- Follow the steps from (2) to export as catalog, changing the File name to "Rated RAWs".
Unrated and Edited RAWs- Contains edited still photos rated 0 stars not captured by a phone. There are only ever a small handful of these, because most edited photos are rated ≥ 1 star.
- Exported as a Lightroom catalog to preserve photo edits.
- How?
- In Lightroom's Library tab, use the Metadata filter to exclude everything captured by a phone. Use filters in the Toolbar to include only 0 star, edited photos or virtual copies, and exclude videos.
- Follow the steps from (2) to export as catalog, changing the File name to "Unrated and Edited RAWs".
Videos- Contains videos not captured by a phone, such as videos captured by my R5 and my drone.
- Exported as a Lightroom catalog for consistency; Lightroom can't edit videos.
- How?
- In Lightroom's Library tab, use the Metadata filter to exclude everything captured by a phone. Use filters in the Toolbar to include only videos, irrespective of rating.
- Follow the steps from (2) to export as catalog, changing the File name to "Videos".
I also like to leave a text file in this folder to mark the starting date and ending date of the photos/videos contained in this offload, e.g. 2025-02-18 - 2025-08-25.txt
And - whew! That's it. Now I can purge the data from my SSD, knowing my photos are offloaded to a safe place and taking up much less space than the original files.
Backblaze will take care of backing up this new Offload folder. Restic will take care of backing it up to my home server and to my external HDD. Done!
Art is personal. Digital organization is art. Take from this what makes sense, and leave the rest.
If you'd like to share something about your workflow, or let me know how this article impacted yours, contact me or join our Discord community.
Support me on Patreon for $3 to download exclusive full-resolution photographs and get notified when I publish work like this.
Thank you for your support!